Showing posts with label embossing. Show all posts

Wednesday, 1 October 2014

Home for the Holidays S1410 : CTMH Stamp of the Month Australasian BlogHop

Welcome to our October Stamp of the month Australasian Close to My Heart Blog Hop. If you have arrived here from Denise's Blog: Scrap Stamp Share then you are in the right place. If you landed here by accident, no problem, please join in by following the link at the end of this post. 

Today I am going to share a cute little embellishment idea that could be used on a card, a tag or on a scrapbook page. I like to call it 'There's a bear in there'.
It features this month's stamp of the month: Home for the Holidays available exclusively throughout October for $27 or for just $5 when you spend $75.


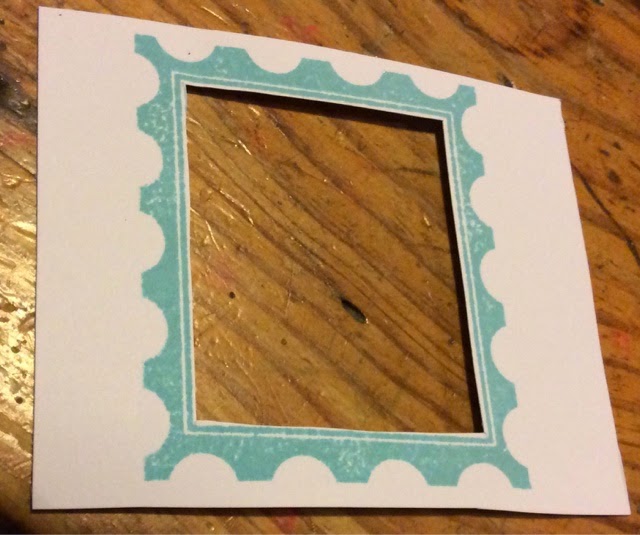
Now you will have to excuse the craft surface you may see in some of my photos, being a Mum of two very active children I completed this project on THEIR craft table so they could 'help'.

Step 1: Stamp the polar bear stamp in Crystal Blue ink onto White Daisy Cardstock. Isn't he cute?


Step 2: I use a technique I entirely made up myself. In saying that I am sure I am not the only person who has ever done this just that it is not something I learnt from anyone else. Ok, so I took one of my son's old textas and removed the ink bit from the inside. I ran it under warm water for a few minutes until the water ran clear. I now how have a thoroughly dead texta. Good. Because what I really want is a fine tip pointy sponge.
I take my new tool and dab it in my VersaMark ink. Then I draw over the top of each snowflake on my stamped image dabbing in the ink in between each one.
I keep my special home made tool in my organiser and I don't let anyone else near it. I have used it for lots of projects now with both the VersaMark ink and also my pigment inks - my previous one met a sad end when someone tried a little too hard to get the texta to work.... grrrrrr.... don't touch other people's tools without asking! Sorry... digressing...


Step 3: Coat with Silver Embossing Powder (and tap off of course). In this case I haven't worried about flecks of dust on the image as it adds to the effect I am creating.
Step 4: Apply heat (as per normal heat embossing).


Step 6: I took my stamp and inked it with Cranberry Ink. Then I took a piece of paper towel and rubbed off the ink on the ears, the facial features and the arms. You could also just use your finger. I don't like to use wet wipes for this because they are sometimes too effective and stop the next bit from working.
Next I used a dauber inked with Cocoa Ink and daubered the face and arms. Then I took a dauber inked with Cotton Candy Ink and daubered the ears.

Step 7: Stamp this onto White Daisy Cardstock. Using micro-tip scissors cut around the bear. Don't leave any colour around the edges of him.


Step 8: Stamp the image again in Crystal Blue ink on white daisy cardstock and cut out the inside of the picture leaving only the frame.


Step 9: Take a piece of Cranberry Cardstock and cut to 3 1/8" x 4 1/4"
In the centre bottom of the back stamp the image again. It does not matter how perfect or imperfect this stamped image is.


Step 10: Cut out the inside of the image including the frame parts - go slightly wider than the frame on all sides.

Step 11: Use adhesive to stick the Crystal Blue Frame to the Cranberry cardstock.


Step 12: Use Glue dots to stick the cut out bear to the embossed image. The glue dots will raise him up off the page just a little bit.


Step 13: Stick the window on top of the embossed image using foam tape.


Step 14: There's a bear in there.... Just decide what you want to do with your little cutie!


Home for the Holidays is only available until  the 31st of October 2014 from your CTMH consultant.

Bear and I would love you to leave a comment before heading off to your next stop: Georgia Creates CTMH.


Friday, 1 August 2014

What A Hoot S1408 : CTMH Stamp of the Month Australasian Blog Hop


Hello and welcome aboard our Stamp of the month Australasian Close to My Heart Blog Hop! Look at us with a brand new Stamp of the Month from a Brand New Ideas Book!!!! Hoot Hoot Hooray!!!
If you have arrived here from Natalie's Close to my Heart Blog then you are in the right place. If you landed here by accident, no problem, please join in by following the link at the end of this post.

So one of the things I do on a regular basis is run workshops for kids. As a Mum and a trained primary school teacher I really enjoy seeing kids of all ages enjoying the creative process and especially the part when they turn to their parents and say 'Look what I made!'.

So today I am going to share some of the techniques I use with kids in a simple stamping session. I have used August's Stamp of the Month 'What a Hoot' available exclusively throughout August for $24 or for just $5 when you spend $75.

This is an amazing stamp to use with kids! It screams creativity. It's like playing dress ups with owls. So much fun!

So when I work with younger kids (today's attendees are 3 year olds), I make sure I get all my materials organised beforehand. I place all my materials in groups on a nearby (but out of reach) table. I want to be able to grab the next step/ activity at a moment's notice. Kids in this age group will not sit quietly while you dig around trying to find a pair of scissors or decide to mix a new paint colour.

So at this session I had a plan that we would create a card. I had all the pieces precut and I had pre-stamped the phrase 'what a hoot' with VersaMark ink onto white daisy cardstock and embossed it with clear super fine embossing powder. I had also mixed up some paint with water - I do this regularly, it makes the paint go further but in this case it also made the paint into more of a wash, which is what I wanted. I had all the stamps prestuck on blocks and the kids table covered in butchers paper.


The kids arrive and it is so exciting to be doing craft!!!

I always start with a stamping activity with no boundaries. This gets the kids used to the blocks, stamps and ink pads (which are super kid friendly - don't worry, nothing toxic here). So I just let them go for it with some plain white paper and a couple of ink pads. I choose colours based on their preferences but also keeping in mind that I don't want the colours to mix so darker colours are better to prevent cross-contimaniation on the pads.

I was really interested to see which stamps they wanted to use together. It's never what you expect.

After some fun I get out my black pigment ink and get the kids to pass me the stamps they want to use on their cards. I do the stamping on this one - pigment ink is a bit too yukky to put in the hands of a 3 year old. After the nod of approval on the cards I cover the stamped image in our very special 'magic pixie dust' (Clear Super Fine Embossing Powder), shake off the excess and while I hold the cards over the toaster I get the kids to say magic words to help the magic happen.

I set the newly embossed images to one side to dry while we do a bit more magic of our own. The pre-stamped 'what a hoot' cards are brushed with the paint solution and.... magic! Words appear! We put these to one side to dry.

Now we can colour our owls. I do not let young children use my excellent alcohol markers. Best markers to use with young kids are Crayola Washables. The number of times I have panicked because texta has appeared on something precious and then run it under a bit of water and it has disappeared has made me a fan of these. Love them.
So why have we bothered to emboss the owls? If you have done colouring with young children recently you will know that they often don't stay in the lines and in the case of my dear boy he often just scribbles over the entire thing making it so you can't see the image at all. When you emboss, however, it creates a plastic coating over the image which prevents the marker ink from colouring it - so even if they scribble over the entire image, you will still clearly see the owl. Clever huh?

Finally we need a pop of colour on our card - a quick mat of coloured cardstock stuck on an angle behind our dear owls helps to create a fun look. With kids I usually just use glue sticks because they are cheap and they can manage them on their own, plus the glue is easy to wipe up if it gets dropped. However when we are just sticking a few pieces down like with this project I help them to use a tape runner - for this project I used my new favorite: EZ dots. Love love love my EZ dots but that is a blog for another day...


Ta da! Look what we made!

The What a Hoot Stamp set  is only available until the 31st of August from your CTMH consultant. I'd love you to leave a comment (or even ask a question) before heading off to the next stop on the Blog Hop- Lisa's blog : Crouchie's Getting Creative